To add a polygon to a graphical sheet click on one of the  buttons in the Add→Shapes ribbon menu button group.
To set the Fill Styles and Line Styles before adding rectangles use the Default Graphics Settings
 Draws a hollow polygon.
 Draws a filled polygon with fill different from the outline.
 Draws a filled polygon with no outline.
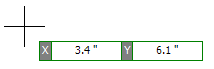
Polygon start point
Left-click when the start cross is where you want to start the polygon or press the Enter key followed by the X value, Enter/Space/Tab key, the Y value, and then Enter/Space/Tab to exactly place the starting point.
As you move the mouse, the first segment of the polygon is defined. Left-click to define its end point or press the Enter/Space/Tab key followed by the length, Enter/Space/Tab, the angle, and Enter/Space/Tab to exactly define the first segment of the polygon.
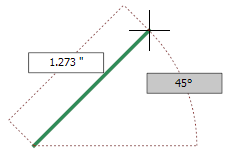
Defining the first segment
Now as you move the mouse the second segment of the polygon is defined. Left-click to define its end point or press the Enter key followed by the length, Enter/Space/Tab, the angle, and Enter/Space/Tab to exactly define the second segment of the polygon.
Defining the second segment
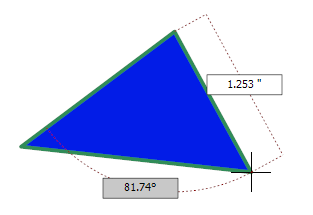
Moving the mouse again, the third segment of the polygon is defined. Left-click to define its end point or press the Enter/Space/Tab key followed by the length, Enter/Space/Tab, the angle, and Enter/Space/Tab to exactly define the first segment of the polygon.

Defining the third segment
Continue this process to add as many line segments as you wish.
Double-click to end the polygon or hit the ESC key to end the polygon with the last placed line segment.