Printing Schematics and PCB Designs
Printing schematics and PCB designs is an essential part of the electronics design process, allowing engineers, technicians, and other stakeholders to review, troubleshoot, and document physical copies of circuit designs. Whether you're printing a schematic for personal reference or preparing a PCB design for manufacturing, there are several steps and considerations to ensure accuracy and clarity. Here's how you can go about it:
Printing Schematics
Schematics are symbolic representations of electronic circuits that use standardized symbols to represent different components and lines to show the connections between them. Here's how you can print them:
•Page Setup: Go to the print setup or page setup section. Here, you can adjust settings like paper size, orientation, and margins. Ensure the settings match the paper in your printer. You may also have options for different line weights (thicknesses), which can make the printout easier to read.
•Scaling: AutoTRAX DEX will allow you to choose whether to scale the schematic to fit the page or print it at a 1: 1 scale. If the schematic is large, you may need to print on multiple pages.
•Print Preview: Always use print preview before printing. This step will show you exactly what will be printed, helping avoid mistakes or wastage of paper.
•Printing: After confirming everything is set up correctly, proceed with printing the schematic.
Printing PCB Designs
When you're ready to print your PCB design, often referred to as 'plotting,' you're essentially preparing it for etching onto a physical board. However, sometimes engineers also print designs on paper for various purposes (like checking for fit in a physical enclosure). Here's the process:
•Prepare PCB Layout: With AutoTRAX DEX, finalize your PCB design. Ensure all routing is complete and verified.
•Load Gerber Files: If you're preparing for manufacturing, you'll need to export your design as Gerber files, which are the industry-standard file types used for PCB manufacturing. This isn't necessary if you're only printing on paper for a quick review.
•Print Setup: In your software, go to the print or plot setup. Choose the correct paper size and any other relevant settings. If you're printing the design on paper for review, you may want to include additional information like a reference ruler or critical dimensions.
•Layer Selection: If you're printing for review, you might not need all layers of the PCB. Select the layers you want to print (e.g., top layer, bottom layer, silkscreen).
•Scaling and Mirroring: Decide if you need the printout in actual size (1: 1 scale) for things like fitting tests. Some applications might require the PCB design to be mirrored, especially if you're doing DIY PCB etching.
•Print Preview: This is crucial for avoiding errors. Check that all texts are readable, and the details are clear, especially if there are many traces or small components.
•Printing: Once everything looks good, print the design.
Additional Tips
•For high precision requirements, especially for actual size prints, ensure your printer can handle the details and check its calibration.
•If you're printing for etching (for homemade PCBs), you might need to print on special transparency paper, and you'll need a design that's mirrored and suitable for your etching process.
•Always double-check all settings, as an error in something like scaling can result in errors in the final PCB, whether it's being manufactured professionally or etched at home.
Printing schematics and PCB designs, whether for professional manufacturing, in-house production, or troubleshooting and analysis, requires a careful approach to ensure the physical copies accurately represent the digital designs.
Printing Your Schematics and PCB Designs
To print any view click the Home→Print→ button.
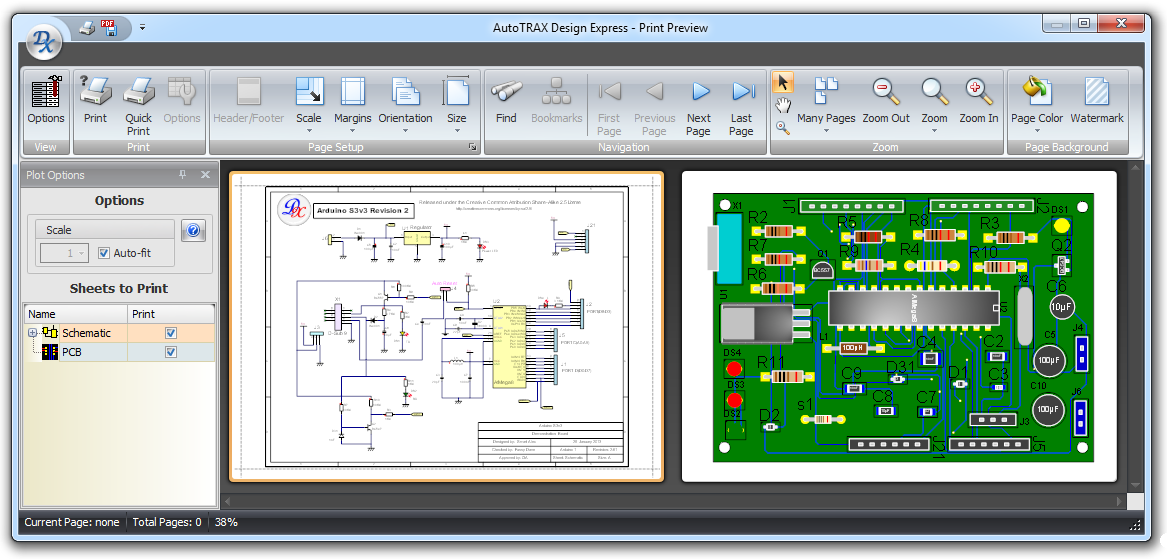
Print Preview
The print preview shown above consists of a ribbon menu, a options panel on the left and a preview window to the right of the options panel and below the ribbon menu.
click  to print the selected pages.
Ribbon Menu
The ribbon menu can be split into 2 parts, the View button group on the left and the common ribbon button groups on the right.
The  button shows/hides the option panel shown below.
Click to read about the Common Print Menu
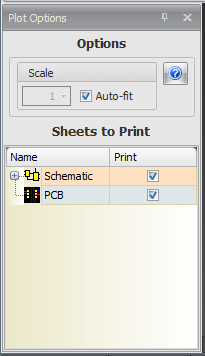
The Option Panel
The options panel lets you scale the printing or have the sheets automatically fill the printed page,
Check  to have the sheets automatically fill the printed page, If you uncheck it, you can set the print scale. Note, it is possible to set the scale such that the sheet will not all fit on the printed page.
Check/uncheck the check boxes in the Print column to include/exclude the sheet in the print run.
Clicking  displays this help topic.
Options Dialog